
Paintings
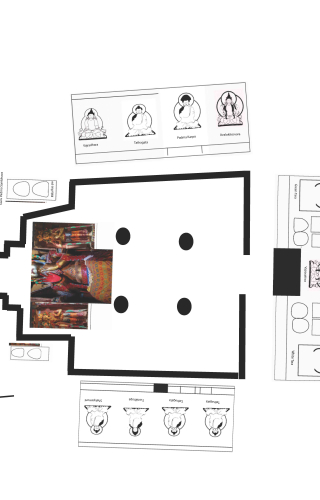
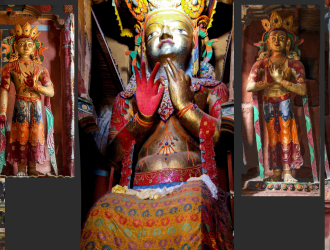
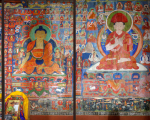
Chamba Lhakhang (approximately 10 x 9 m, with the ceiling at a height of 5.5m) (Fig. 1) is located at the highest point of the fort complex at Basgo. Here, the large stucco of the Chamba is seated in an offset (approximately 3 x 3 m) on the north side, with its feet extending to the base of the pillars. The Chamba is flanked by two standing stucco figures of Avalokitesvara. (Fig. 2).
The Lhakhang was commissioned by Tashi Namgyal (bKra sis rnam rgyal, reign. c 1555–75) and the paintings were executed under the patronage of his nephew Tsewang Namgyal (Tshe dbang rnam rgyal, r. 1575–95). The paintings are attributed to Pon Dondrup Lepa (dpon Don grub legs pa) from Spituk (Dpe thub).[i] Much of this information is recorded in an inscription on the royal panel (Bue 2007:189).
The paintings are bright with luminescent colours and measured organisation of the pantheon, all sitting in attendance with the Maitreya (the future Buddha) presiding. The abundance of wall space available due to the high ceiling has been used with restraint by the artist without overcrowding the composition[ii]. The paintings have been executed in the fully developed Central Tibetan style, marking a shift from a style influenced by the stylistics of the Indian subcontinent, in particular, Kashmir (Snellgrove & Skropski 1979:97). The geometric precision of the layout and the considered space division unify the individual panels into a grand narrative, intended to overwhelm the believers and the non-believers alike.
The painting technique—distemper (pigment mixed with glue, commonly referred to in India as tempera[iii]) on mud plaster—conforms to the canonical injunctions. The materials (pigment, gold, glue) are of very high quality retaining a luminescence, despite the centuries gone. Gold leaf has been used to express the area of the exposed body of all the major figures (for more details on the technique, see Dhar 2010).
A band of undulating festoons held in the mouth of Kirtimukha (an auspicious motif depicting a ‘face of glory’) with alternating sun and crescent moon symbols, runs all along the top of the wall. A horizontal band above the dado illustrates the Life of the Buddha. The horizontal space on all the three walls is divided into four parts. Each vertical has a seated figure (about 2.5 m) on a throne, surrounded by attendants and the Kula (family). In a horizontal band running above the dado are scenes from the Life of Buddha (Fig. 3).
West Wall (Fig.4): Following the chronology of the Buddha’s Life, starting at the north end of the west wall[iv]; the first image is of Vajradhara[v], the Adibuddha who is the originator of the five Tathagatas—‘Five Dhyani Buddhas’[vi] and the five kulas (Bhattacharyya 1958:44) with the 84 Mahasiddhas seated on all sides. A portrait of Mila ras pa, a Drukpa lineage Guru, is placed on the adjoining north wall, below Guru Padmasambhava. Vajradhara is shown with his hands crossed over his chest holding a vajra (thunderbolt) in each hand, seated in padmasaana (lotus posture) on a lotus throne, with mythical composite figures of bird men heralding on either side. The top of the throne is decorated with beautiful swirls of coloured flowers. On either side of the top of the throne are renditions of the sun and moon along with attendant deities. Next to Vajradhara is the figure of a seated Tathagata[vii], with one hand in the varada (act of giving) mudra (hand gesture) and the other hand on his lap holding a bowl. He is flanked by Bodhisattvas Padmapani and Vajrapani, on either side. Above this, on one side of the elaborate throne is a four-armed Manjushri, while the image in the corresponding area on the other side is missing. On either side above are registers with repeated images of the five Buddhas, starting with the Akshobya (Blue), Ratnasambhava (Yellow), Amitabh (Red), Vairocana (White) and Amoghsiddhi (Green). Below these is a repetition of the five Buddhas in their sambhogakaya (earthly form, wearing jewellery). White Tara in lalitasana (one leg pendent and the other folded over) and the two-armed Mahakala with Buddha in sambhogakaya, are depicted on either side of the throne pedestal.
The remaining two images on the western wall (Padma Karpo, and the four-armed Avalokiteshvara) are not a part of the original painting scheme of the 16th century. This area must have been damaged due to water seepage, after which it has been repainted.[viii] The image of Padma Karpo has been integrated with some of the original surviving 16th century paint. The area below the Avalokiteshwara has a plethora of all the favourite Kagyu deities in no particular order—Mahakala, Paldon Lamo, Manjushri, Guru Padmasambhava, Shambunatha and Chakrasamhara. The two latter images on the western wall are in contrast with respect to style and quality of execution. In order to complete the pentad of Buddhas in the Lhakhang, two Tathagatas would have been originally painted in the space where the two later additions of Avalokitesvara and Padma Karpo have been made.
South Wall (Fig. 5): At the west end of the southern wall is a beautiful depiction of the Goddess Green Tara seated on a Makara throne with Garuda at the top. Sudhankumara[ix] and Bhrikuti stand in attendance on either side of the main figure. The area along the west corner was damaged. On the opposite side are multiple figures of female goddesses who do not carry any kind of ornamentation and are coloured entirely green. On the eastern end, White Tara in lalitasana, is depicted seated on a Makara throne, with eyes on her hands and feet. She has two standing attendants and is surrounded by figures of female goddesses in lalitasana, all holding a flower in one hand, and the other hand in the varada mudra. Each of these figures has a different body colour (yellow, brown, white and red). Above the entrance (centre) is a fine depiction of Vajrasatva holding a vajra in one hand and the bell in the other. He is shown seated on a lotus throne with an elaborate floral backrest. On either side of him, is a vertical band with six figures in pairs over three registers. The lower register has fierce deities (the only depiction of fierce deities in the entire Lhakhang); Above this are the protector deities of the cardinal directions, while the top register has other gods. On the left (facing the wall) top register is Manjusri alongside the Buddhist deity Ushnishavijaya. In the register below, there is Dhritarashtra playing the lute with the Guardian King Virudhaka. To the right in the same register are Virupaksa, holding a stupa; and Vaisravana, with the parasol. The bottom register has the two-armed Mahakala with a blue Yamaraja on the left side and minor deity Srikantha (holding a flaming sword and a skull cup) and another fierce deity on the right side.
East Wall (Fig. 6): Continuing the theme of the five Tathagatas on the east wall, the image close to the south wall depicts the Buddha in padmasana (cross-legged posture) on a lotus throne in the dhyana (meditation) mudra; with both his hands placed on the lap, holding a bowl. The lotus pedestal is held by a series of roundels that emanate from two vases held by a Naga couple. Each of the roundels has a snow lion, an elephant and a peacock; the pattern is repeated on the other flank too. On either side of the main image in attendance are two bodhisattvas. In the next image, one of the five Tathagatas is shown in the vitarka (debating/arguing) mudra as he holds the bowl with a stupa in his lap and is flanked on both sides by bodhisattvas as attendants. The throne has composite figures (birds and humans) playing musical instruments.
Next in the yellow conical Pandita hat[x], seated in the padmasana, hands in the dharmachakrapravartan (setting in motion the wheel of dharma) mudra, holding the stems of lotus flowers, with a flaming sword and a book placed on either side above the shoulder—is Tsonkhapa, the founder of the Gelugpa sect[xi], along with his two disciples, Gyaltsap and Kedrup in attendance. On the throne, in a small register is a representation of the Guhyasamaja (Akshobyavajra) (Fig. 7) along with Yama Dharmaraja (Blue). Tsongkhapa is surrounded by the Gelugpa lineage gurus. It has been argued that this figure is that of Atisha. However, with so much concurrence in the iconographic detail with Tsongkapa, it is difficult to support the identity of this image as Atisha.[xii]
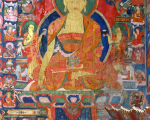
Close to the north wall, the composition opposite to Vajradhara is of Shakyamuni and the 16 Arhats (Indian Buddhist saints or elders) (Fig. 3). Shakyamuni is shown in the bhumisparsha (touching the earth) mudra with a bowl in his lap. His disciples, Shariputra and Maudgalyayana, stand on either side in attendance. He is depicted, surrounded by the 16 Arhats and the four guardian kings in a line, in the lower area.[xiii]
Life of Buddha: In the horizontal band above the dado is a fine example of the scenes from the Life of the Buddha (Fig. 8). The narrative starts from the west wall under the image of Vajradhara and ends on the east wall under the image of Shakyamuni. Each major life event is narrated following a long-established visual vocabulary and iconography, starting with the court of Shudhodan and ‘Maya’s dream’ and ending on the east wall with the Mahaparinirvana and Buddha’s cremation (Fig. 9).
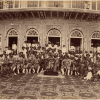
The Royal Panel (Fig. 10): The panel to the right of the south wall (facing the wall) depicts the royal family along with their attendants. All the members of the royal family are arranged in order of the existing court hierarchy. King Tsewang Namgyal (identified by an inscription), with his two brothers, and other important members, are placed slightly off the centre and are shown larger than the rest. The composition then tapers on both sides in order of importance, with common people and attendants at the very end. The queens and other royal ladies are seen on the right—on the left are the senior court officials followed by their wives, and ladies of the court towards the very end. Both ends of the composition are filled with attendants and common people standing and facing the king. The scene appears to have been set in an orchard, with a decorated textile arranged as the backdrop. The King and his brothers have a canopy on top. In the foreground, attendants are seen serving food and drinks. All the figures are dressed in what has been called ‘Kashmiri/Moghul’ (Snellgrove & Skropski 1979:93) mode, particularly the headdresses of the men. The ladies though are dressed in the traditional Ladakhi/Tibetan manner with a perak[xiv] covering the head.
Notes
[i] Lo Bue, on the basis of inscriptions, suggests that the paintings in the Tsuk Lhakhang at the Tashi Choszang monastery in Phiyang belong to the same period as the Chamba Lhakhang, Basgo (2007:189).
[ii] Within the Lhakhang, the later additions in areas of loss, Avalokitesvara and Padma Karpo are filled with a number of gods placed next to each other without following any organising principles.
[iii] In India, the traditional technique of pigment mixed with glue or gum is commonly referred to as tempera. This is not correct since the term ‘tempera’ is defined differently in the West. However, the term now has a long history of usage within the Indian context. Distemper, or pigment mixed with glue, is technically the right word for describing the technique.
[iv] Snellgrove and Skropski, commenting on the arrangement of the figures in the Lhakhang write, ‘On the two longer side-walls, there are a total of eight major figures represented, but the arrangement seems to be quite haphazard as is often the case in these later-style Tibetan temples.’ Then they go on to describe the various images starting from the east wall. However, this observation seems to be biased by the authors’ affinity to the Kashmiri painting style of Alchi.
[v] The iconography of the figures and identification is primarily based on Chandra, Lokesh (2006) and the Himalayan Art Resources website, online at: http://www.himalayanart.org/.
[vi] The term ‘Dhyani Buddha’ to describe the pentad of Buddhas is avoidable as this does not have any historical precedent.
[vii] The head of this figure was completely lost due to water seepage. This area was extensively repaired and the missing head was reconstructed during the 2002–06 conservation campaign.
[viii] The exact time frame when these paintings were done is not clear; however, since Snellgrove and Skroupski have mentioned these paintings it can safely be assumed that they date prior to 1977 which is when Snellgrove visited Ladakh.
[ix] Identification of various deities is fraught with risks and problems because it is often difficult to identify the original context (literature) on which the dharni (descriptive mantra) of the figure is based. Attempts have been made to try and collate iconographic features on the basis of published encyclopedia but a wrong identification is possible, since this is the first time comprehensive deification has been attempted.
[x] Lo Bue has argued in favour of Snellgrove’s identification (Bue 2007:180)
[xi] The Pandita figure has been identified as Atisha by Snellgrove and Skroupski
[xii] Dr Jamspal has also identified the image as that of Tsongkhapa (Lobzang 1997:149)
[xiii] This composition usually has 25 figures; however, due to the damage and repainting in the lower corner adjoining the wall, the newly painted figures do not concur with traditional composition.
[xiv] The Perak is a flat metre-long base of fabric and leather, with flaps that fall over the ears when worn. The entire surface is covered with turquoise and coral stones.
References
|
Bhattacharyya, Benoytosh. 1958. The Indian Buddhist Iconography. Calcutta: Firma K. L. Mukhopadhyay. |
|
Bue, Erberto Lo. 2007. ‘The Gu ru lha khang at Phyi dbang: A Mid-16th Century Temple in Central Ladakh.’ In Proceedings of the Tenth Seminar of the IATS: The Western Himalayas; Essays on History, Literature, Archeology and Art, edited by Amy Heller and Giacomella Orofino, 175–96. Leiden: Brill. |
|
Chandra, Lokesh. 2006. Buddhist Iconography: Compact Edition. Delhi: Aditya Prakashan.
|
|
Dhar, Sanjay. 2010. ‘Documentation and Emergency Treatment of Wall Paintings in the Chamba Lakhang (Maitreya Temple): Developing a Methodology to Conserve Mural Paintings in India’s Ladakh District.’ In Conservation of Ancient Sites on the Silk Road: Proceedings of the Second International Conference on the Conservation of Grotto Sites, Mogao Grottoes, Dunhuang, People’s Republic of China, June 28-July 3, 2004, edited by Neville Agnew, 286–96. Los Angeles: GCI.
|
|
Jamspal, Lobzang. 1997. ‘The Five Royal Patrons and Three Maitreya Images in Basgo.’ In Recent Research on Ladakh 6: Proceedings of the Sixth International Colloquium on Ladakh, Leh 1996, edited by Henry Osmaston and Nawang Tsering, 139–56. New Delhi: Motilal Banarsi Das Publisher Pvt. Ltd.
|
|
Luczanits, Christian. 2005. ‘The Early Buddhist Heritage of Ladakh Reconsidered.’ In Ladakhi Histories; Local and Regional Perspectives, edited by John Bray, 65–96. Leiden: Brill.
|
|
Snellgrove, David L., and Tadeusz Skorupski. 1977. The Cultural Heritage of Ladakh, Vol I, Central Ladakh. Warminister: Aris & Phillips. |
Internet Resources
|
Himalayan Art Resources |