TOOLS
1. Karandi
|
Vernacular name |
Karandi |
|
English name |
Bricklayer's trowel or plastering trowel |
|
Description |
A blade head shaped like a peepal leaf, made of flat stainless steel with a hard wooden handle |
|
Purpose |
Used for picking, mixing ingredients to prepare masonry mortar; spreading, levelling and shaping mortar to be plastered on the wall. The wooden handle is used to tap and beat on semi-dried plaster to release air, which gets trapped and creates cracks on the surface of the wall. |
2. Tasla
|
Vernacular name |
Tasla |
|
English name |
Iron tasla |
|
Description |
A flat surface with a wide opening and thin steel bowl |
|
Purpose |
Used as a container to mix ingredients and carry mortar to plaster the wall for the painting |
3. Tesi
|
Vernacular name |
Tesi |
|
English name |
Belt axe |
|
Description |
A small and lightweight hammer |
|
Purpos e |
Used for scraping and cleaning the surface brick of the wall. The wooden handle is used to tap on the plaster to release air trapped in the dry layer of plaster. |
4. Chhanna
|
Vernacular name |
Chhanna |
|
English name |
Window mesh sieve |
|
Description |
Rectangular wooden-framed galvanized wire screen mesh |
|
Purpose |
Used to sieve brick powder |
5. Two variants of hand floats (one made of steel and the other wood)
|
Vernacular name |
Gurmala |
|
English name |
Flat trowel or finishing trowel or steel trowel |
|
Description |
A rectangular thin blade made of steel and grounded with a wooden or steel handle |
|
Purpose |
Used to smoothen, level or texture the top layer of mortar on the wall |
|
Vernacular name |
Gurmala |
|
English name |
Wooden fresco hand float |
|
Description |
A rectangular wooden block with a wooden handle in the centre |
|
Purpose |
Used to smoothen the surface of the plaster, and to help remove imperfections and produces a flatter surface |
6. Patti
|
Vernacular name |
Patti |
|
English name |
Scraper |
|
Description |
A thin rectangular metal blade made of steel with a sturdy wooden handle |
|
Purpose |
Used to mix and apply lime putty on the plastered wall |
7. Spray
|
Vernacular name |
Spray |
|
English name |
Watering spray gun |
|
Description |
A nozzle with a pressure controller with an attached plastic water container |
|
Purpose |
Used for curing a small portion of the wall and plaster |
MATERIALS
1. Keri
|
Vernacular name |
Keri |
|
English name |
Red brick dust |
|
Preparation |
Breaking bricks into small pieces with a hammer and using a sieve to filter the dust |
|
Purpose |
One of the three ingredients for making mortar to prepare the first layer of the plaster wall |
2. Rayh-taah
|
Vernacular name |
Rayh-taah |
|
English name |
Grey Sand |
|
Source |
Riverside sand/Baloo |
|
Purpose |
One of the three ingredients for making mortar to prepare the first layer of the plaster wall |
3. Bhejya Chunna
|
Vernacular name |
Bhejya Chunna |
|
English name |
Slaked lime |
|
Preparation |
White powder or crystals slaked with water for at least 6 months |
|
Purpose |
One of the three ingredients for making mortar to prepare the first layer of the plaster wall |
4. CTS Company’s chunna
|
Vernacular name |
CTS Company’s chunna |
|
English name |
Lime putty |
|
Description |
A creamy white material applied on a plastered wall before painting |
|
Purpose |
As filler of hairline cracks or pores on any plastered surface. Putty helps in the preparation of a uniform, smooth and levelled up surface for the painting. |
5. Chhappai da kagaz
|
Vernacular name |
Chhappai da kagaz |
|
English name |
Tracing paper |
|
Preparation |
By creating pin holes to perforate the motif |
|
Purpose |
Placement of motif in definite proportion on the wall |
Essential steps for making Mohrakashi motifs
The Mohrakashi technique requires wet lime as an essential ingredient in all the stages and layers. The artist has to first select a portion of the wall, select motifs or patterns to maintain speed and skill while following the technique of Mohrakashi. For creating a single motif on the wall in mohrakashi techniques the following steps are followed by the artist:
Step 1: Preparation of the mortar for the first layer of plaster on the wall
In a tasla, three of the ingredients are collected in the following proportions:
- Keri (broken baked brick) 3 parts
- Ray-taah (river sand) 2 parts
- Bhejya Chunna (hydrated lime) 5 parts
These are mixed thoroughly with accurate consistency. In winters, the water in the lime supports the required consistency for the mortar and in summer, one needs to add extra water for keeping the consistency.
Step 2: Curing a portion of the brick wall for plastering the first layer
Before applying the prepared mortar to plaster the wall, the wall needs to be rough and moist. In winters, spraying water for a few minutes helps hold the mortar together on the wall; whereas in summer, curing on the wall is a lengthy process.
Step 3: Plastering the first layer on a portion of the brick wall
With a karandi, the lime-sand-brick mortar is applied and spread on the wall. The mortar is plastered such that it creates a first coat of a minimum 12 mm thickness. Thereafter, with the help of a gurmala, the plastered surface is levelled and kept rough for a second coat. The wall is left to dry overnight.
Step 4: Releasing air traps and repairing cracks
The next day, there may be a few cracks visible on the surface of the first layer due to air getting trapped. These are released by tapping them with the wooden round head of either the karandi or a tesi, depending on the size of the cracks.
Step 5: Preparation and plastering the second layer
After two days, the surface of the first layer may remain at a semi-dry stage and may be in the condition to assimilate the second layer. Now, lime and sand are mixed in a tasla in identical proportions. This mortar is then applied on the first layer of the plaster with the help of trowel. The thickness of the second layer is meant to be of a few millimetres. The layer is kept to dry for a day in winter; while in summer, the third layer is created immediately.
Step 6: Lime coating as the third layer
A thin layer of lime is applied on the second layer of plaster with a scraper from top to bottom and in a semi-circular shape. It is kept to dry for a few minutes, while the colours are prepared.
Step 7: Transferring the motif on the plastered portion of the wall
The tracing paper that has perforated holes on a motif is set on the dried final layer. The cloth is dipped in indigo (neel) powder and is smeared on the tracing paper so that the pattern is transferred on the wall.
Step 8: Outlining the pattern
The red pigment is mixed with gum and applied with a brush on the final layer of the plaster wall. The outline of the motif is made by the brush from top to bottom. Thereafter, a thin coat of lime is applied over the motif.
Step 9: Making of the colours
The natural stone pigments are bought from the market in a very fine-dust powdered form. These are soaked in water and diluted well. They are again ground with glass stone. Then, a few drops of Arabic gum are added to the mixture. Before applying the colours to the layer, the pigments are mixed well in a shell.
Step 10: Flat filling of pigment colours
The colours are painted flat from top to bottom with a round brush. The hand movements with the brush either rest on the weight of the little finger or freely float on the motif. So, selection for application of colours depends upon the top colours of the motif.
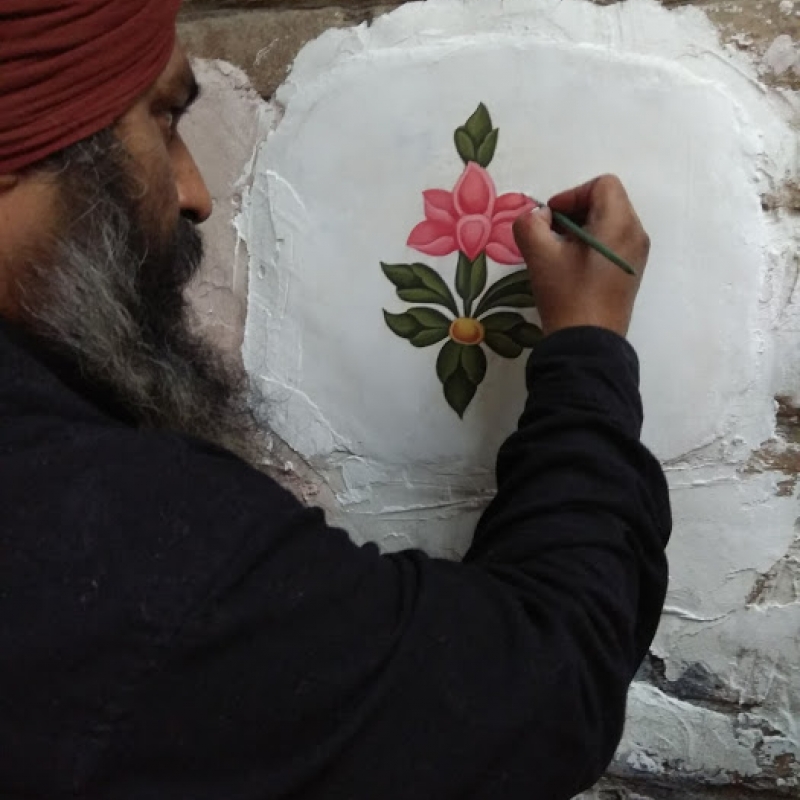
Step 11: Detailing of the motif
The motif is made intricate by using various strokes of thin, thick, round and curvilinear lines from various shades of the pigment colours. The detailing can only be done till the ground plaster has moisture. Therefore, the pigment combines with the ground lime and becomes stone again.
Step 12: Outlining and finishing
The pattern is outlined with lime on the same day. Mostly, mohrakashi has a white background due to the colour of lime. On some occasions, lighter shades of colours are also used to outline the motif.